
다섯번째 포스팅까지 진행이 완료되어도 실제로 웹사이트를 구동해보면 오류로 인해 제대로 구동되지 않습니다. 필요한 라이브러리나 헬퍼등이 로드 되지 않았기 때문입니다.
application/config/hooks.php 파일을 열어 다음과 같이 추가합니다.
<?php
defined('BASEPATH') OR exit('No direct script access allowed');

/*
| -------------------------------------------------------------------------
| Hooks
| -------------------------------------------------------------------------
| This file lets you define "hooks" to extend CI without hacking the core
| files.  Please see the user guide for info:
|
|	https://codeigniter.com/user_guide/general/hooks.html
|
*/
$hook['pre_controller'][] = array(
    'class' 	=> 'HookPreController',
    'function' 	=> 'init',
    'filename' 	=> 'HookPreController.php',
    'filepath' 	=> 'hooks'
);
$hook['post_controller_constructor'][] = array(
    'class'    	=> 'HookPostControllerConstructor',
    'function' 	=> 'init',
    'filename' 	=> 'HookPostControllerConstructor.php',
    'filepath' 	=> 'hooks'
);
$hook['display_override'][] = array(
    'class'    	=> 'HookDisplayOverride',
    'function' 	=> 'init',
    'filename' 	=> 'HookDisplayOverride.php',
    'filepath' 	=> 'hooks'
);
여기서 세개의 후킹 클래스를 만들건데요,
pre_controller는 컨트롤러가 초기화 되기 직전에 호출됩니다.
post_controller_constructor 는 컨트롤러가 초기화 된 직후에 호출됩니다.
display_override 는 사용자에게 화면이 보여지기 직전에 호출됩니다.
먼저 application/hooks 폴더에 HookPreController.php 파일을 생성하고 아래와 같은 코드를 붙여넣습니다.
<?php
defined('BASEPATH') OR exit('No direct script access allowed');
/*************************************************************
 * Class HookPreController
 ************************************************************/
class HookPreController {

    /*********************************************************
     * 컨트롤러가 호출되기 직전에 실행합니다.
     ********************************************************/
    function init()
    {
        $uri =& load_class('URI', 'core');
        $seg = $uri->segment(1);

        define("IS_ADMIN_PAGES", strtoupper($seg) === 'ADMIN');
        define("IS_AJAX_REQUEST",  !empty($_SERVER['HTTP_X_REQUESTED_WITH']) && strtoupper($_SERVER['HTTP_X_REQUESTED_WITH']) == 'XMLHTTPREQUEST' );
    }
}
간단하게 현재페이지의 정보를 상수로 선언하는 후킹클래스입니다. uri중 첫번째가 admin 이라면 admin페이지라고 인식하고, ajax 리퀘스트가 헤더정보에 포함되어있으면 ajax 호출이라고 명시하는 용도입니다.
두번째로 application/hooks 폴더에 HookPostControllerConstructor.php 파일을 추가하고 아래의 코드를 붙여넣습니다.
<?php
defined('BASEPATH') OR exit('No direct script access allowed');
/*************************************************************
 * Class HookPostControllerConstructor
 ************************************************************/
class HookPostControllerConstructor {
    protected $CI;

    function init() {
        // 인스턴스화 된 컨트롤러를 불러와 참조시킨다.
        $this->CI =& get_instance();

        $this->load_config();
        $this->setup_device_view();
    }

    /**************************************************************************************************
     * 환경설정 파일을 로드한다.
     *************************************************************************************************/
    function load_config()
    {
        // 환경설정 파일이 존재하지 않으면 종료
        if(!file_exists(APPPATH.'/config/wwconfig.php')) {
            exit('Config FIle Not Found');
        }
        // 환경설정 파일을 불러옵니다
        require_once(APPPATH.'/config/wwconfig.php');

        $this->CI->config->set_item('base_url', BASE_URL);
        $this->CI->config->set_item('cookie_domain', COOKIE_DOMAIN);
        $this->CI->load->database();

        $this->CI->load->helper(array('url','form','cookie','common'));
        $this->CI->load->library(array('site','session','user_agent'));
    }


    /**************************************************************************************************
     * 현재 접속한 기기정보와, 보기 모드 설정들을 정의한다.
     *************************************************************************************************/
    function setup_device_view()
    {
        // 모바일 접속여부에 따라 device 정보 확인
        $device = $view_mode = $this->CI->agent->is_mobile() ? DEVICE_MOBILE : DEVICE_DESKTOP;

        // 해당 모드로 보기 쿠키가 존재한다면 해당 보기 모드로
        if( get_cookie( COOKIE_VIEWMODE )  && ( get_cookie( COOKIE_VIEWMODE ) == DEVICE_DESKTOP OR get_cookie( COOKIE_VIEWMODE ) == DEVICE_MOBILE) )
        {
            $view_mode = get_cookie(COOKIE_VIEWMODE);
        }

        // 사이트 정보에 저장
        $this->CI->site->device = $device;
        $this->CI->site->view_mode = $view_mode;
    }
}
load_config 함수 에서 두번째 포스팅에서 만든 application/config/wwconfig.php (본인의 취향에 따라 다른이름으로 생성하셨을 수도 있습니다.) 파일을 불러옵니다. 이곳에 각종 상수들을 선언했으므로 이파일이 제대로 존재해야 제대로 구동이 됩니다.
setup_device_view 함수에서 현재 접속한 기기와 뷰모드를 가져와 Site라이브러리에 저장을 해둡니다. $this->site->device 에는 실제로 접속한 기기 (desktop / mobile)을 저장해두고, 불러올 테마는 $this->site->viewmode에 저장해놓습니다. 이렇게 따로 분리해놓는 이유는 모바일에서 PC버젼보기 등을 이용할때 같이 실제 기기와 보는 테마가 다를수 있기 때문입니다.
마지막으로 application/hooks 폴더에 HookDisplayOverride.php 파일을 생성해주고 다음과 같이 코드를 집어넣습니다.
<?php
defined('BASEPATH') OR exit('No direct script access allowed');
/*************************************************************
 * Class HookDisplayOverride
 ************************************************************/
class HookDisplayOverride
{
    protected $CI;

    function init()
    {
        $this->CI =& get_instance();

        // RSS파일이거나 SITEMAPMAP.XML 파일 같은경우엔 사용하지 않는다.
        $output = !( $this->CI->uri->segment(1) == 'rss' OR strpos($this->CI->uri->segment(1), "sitemap") !== FALSE )
            ? $this->set_layout( $this->CI->output->get_output() )
            : $this->CI->output->get_output();

        $this->CI->output->_display($output);
    }

    function set_layout($output)
    {
        // AJAX 요청이거나, 테마설정이 FALSE 인경우엔 가공하지 않고 그대로 내보낸다.
        if( IS_AJAX_REQUEST OR $this->CI->theme === FALSE ) return $output;

        // Script Tag를 모두 가져온다.
        preg_match_all("/<script\\b[^>]*>([\\s\\S]*?)<\\/script>/", $output, $matches);
        $output = preg_replace("/<script\\b[^>]*>([\\s\\S]*?)<\\/script>/","", $output);

        // 하단에 붙일 태그를 가공해준다.
        $foot = "";
        $foot .= $this->CI->site->display_js() . PHP_EOL;
        foreach($matches[0] as $match) $foot .= $match;

        // 관리자에서 설정한 추가 script 태그가 있다면?
        if( IS_AJAX_REQUEST && ! IS_ADMIN_PAGES && ! $this->CI->agent->is_robot() )
        {
            $foot .=  (! empty($this->CI->site->config('extra_tag_script')) ) ? $this->CI->site->config('extra_tag_script').PHP_EOL : '';
        }

        $output = str_replace("</body>", $foot.PHP_EOL."</body>", $output);

        // HTML파일을 압축시킨다.
        ini_set("pcre.recursion_limit", "16777");
        $re = '%# Collapse whitespace everywhere but in blacklisted elements.
        (?>             # Match all whitespans other than single space.
          [^\S ]\s*     # Either one [\t\r\n\f\v] and zero or more ws,
        | \s{2,}        # or two or more consecutive-any-whitespace.
        ) # Note: The remaining regex consumes no text at all...
        (?=             # Ensure we are not in a blacklist tag.
          [^<]*+        # Either zero or more non-"<" {normal*}
          (?:           # Begin {(special normal*)*} construct
            <           # or a < starting a non-blacklist tag.
            (?!/?(?:textarea|pre|script)\b)
            [^<]*+      # more non-"<" {normal*}
          )*+           # Finish "unrolling-the-loop"
          (?:           # Begin alternation group.
            <           # Either a blacklist start tag.
            (?>textarea|pre|script)\b
          | \z          # or end of file.
          )             # End alternation group.
        )  # If we made it here, we are not in a blacklist tag.
        %Six';
        $newOutput = preg_replace($re, "", $output);
        if( $newOutput === null) {
            $newOutput = $output;
        }

        return $newOutput;
    }
}
코드의 내용을 요약하자면 AJAX요청이나 테마가 지정되지 않은경우 나중에 넣을 RSS나 Sitemap 을 제외하고는 가공을 하는 내용입니다.
Script 태그를 모두 가져와서 </body> 바로 위로 옮겨주고,
관리자에서 추가스크립트를 설정해서 넣을수 있게 이부분도 추가해줍니다.
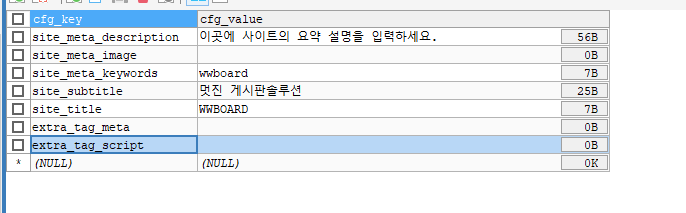
Mysql 에서 만들었던 ww_config 테이블에 extra_tag_script 라는 키를 가진 행을 하나 추가해줍시다.
다음페이지에서는 드디어 테마를 이용해서 간단한 페이지를 만들어 테스트해보도록 하겠습니다.